PStill does also work with other virtual printer programs like "CutePDF", see here for setup hints.
Setup PStill/Win as virtual printer
PStill comes in two flavours, the GUI version is called 'gpstill.exe' and the command line version is called 'pstill.exe'. The later can be used in scripts or - with the help of a virtual printer driver like RedMon in an environment to produce PDF direct from any application without the need to save as PostScript before.The following steps describe how to setup RedMon 1.2x for use with PStill/Win. Please note RedMon is a separate product of Ghostgum Software, Russell Lang, who gave me kind permission to present this information here and therefore you should refer to its own license if you choose to use it. All information given here is only for convenience. In case of questions about RedMon please refer to the original author.
Step 1. Get and install PStill/Win
See the PStill/Win page for details and the newest version of PStill/Win. Remember the path where you unpacked it, you'll need it in Step 3..
Step 2. Get and install RedMon
See the RedMon page for details and the newest version of RedMon. Be sure to read the license, RedMon is not part of the PStill distribution
Step 3. Create a new printer in Windows
Use the Windows 'New printer' wizard to create new PostScript Printer. Configure as 'Local printer', setup as 'Canon PS-IPU Color Laser Copier' for color output or as 'Apple LaserWriter II NT' for black/white output. Use the Windows supplied driver if possible.Now select the port 'RPT1: Redirected Port' for the printer connection. If you do not see this port RedMon is not installed correctly.
Click on 'Properties' or 'Configure connection'. And use this dialog as a template:
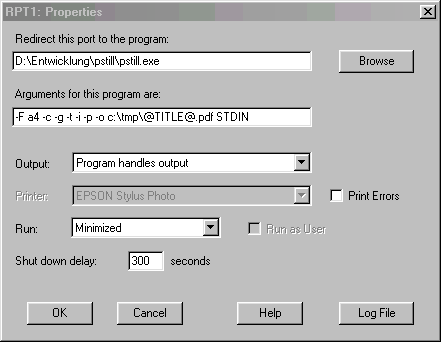
You may need to change the values of the paths, both the program path (where RedMon should find the pstill.exe) and in the Arguments (where pstill should place its PDFs, the 'PDF output folder', in above example this is the c:\tmp folder). The @TITLE@ will be replaced by the true document title you create. If you want to produce for other formats change -F a4 to -F a3. This format setting is overridden by the job settings and only sets an 'outer' default limit on the page size.
Step 4. Setup the connection (Printer Properties)
You need to modify the setting of the connection properties, if you use pstill now it will fail as it does not return status information to the Windows printing system. To setup finished the wizard dialog, give the printer a name and do NOT print a testpage yet. Open the printer properties again (right-click on the printer entry, then select Properties), select 'Details', select 'Spooler Setup'. Set it to 'Dataformat RAW' (direct printing to the printer, do not spool) and disable bidirectional. Click Ok. select 'Common' and print a testpage. After a few seconds you should find a file called 'testpage.pdf' in you PDF output folder. Likewise you can now print from any other Windows program and the document will be placed as PDF in the PDF output folder with the correct title (all special characters are translated to '_').
Tips and Troubleshooting
- Older versions of pstill.exe (pre 1.54 versions) does need a c:\tmp folder if you don't specify your own temporary directory using the '-T pathname' option.
- The bidirectional setting must be disabled, otherwise pstill.exe is constantly restarted by RedMon.
- To have PStill output to a user defineable file, setup RedMons Output to "Prompt for Filename" and use %1 for the output file parameter. Your 'Arguments for this program' in RedMon should read: -F a4 -c -g -t -i -p -o "%1" STDIN. As you see all you need to change @TITLE@.pdf to "%1".
- You can use all features in PStill, e.g. so to have output PStill to JPEG compressed PDF (JPEG quality 70) using maximum compression and 300 dpi accuracy on a large initial paper format of 1500 x 2000 pts use this line for 'Arguments for this program': -w 1500 -h 2000 -d 300 -c -c -c -c -g -i -p -t -J 70 -o @TITLE@.pdf STDIN
- (Registered Version only) You can also use this method to create normalized PostScipt (flattened) or EPS, to run PStill as a PostScript normalizer use this line for 'Arguments for this program' in RedMon: -F a4 -m P -o @TITLE@.ps STDIN, to output to EPS (first page of the generated print job is taken as an EPS may only contain one page): -F a4 -m E -E 1 -o @TITLE@.eps STDIN
- In case your text turns out of inferior quality chances are the the Windows print mechanism has embedded its fonts as bitmaps. PStill has no choice in this case than to write them as bitmaps in the resulting PDF. You can tune your Windows printer driver settings however using the printer option dialog. It is advisable to set the outline limit for fonts to a much smaller value than the default 100. PStill will achieve best results if a) printer fonts are used (See the font replacement table in your printer driver options) and b) these fonts are installed in PStill's PSFonts folder. This way PStill has complete control over the fonts and the PDF results. If a font is embedded in a job PStill can use it too, but then has to deal with potential format issues and embedding in the PDF result may be impossible. Starting with Version 1.55.9 PStill can also handle TrueType fonts embedded in the input jobs if Level 2 PostScript is set to active.
This information here is provided only for convenience, RedMon is copyright Ghostgum Software, Pty, Russell Lang, All rights reserved. CutePDF is a trademark of Acro Software Inc. Other trademarks are used for identification purpose only.